How to Install DixMax APK on Mac (Complete 2026 Guide)
Getting Dixmax for Mac running takes a slightly different path than it does on Windows, mainly because of how Apple's hardware has shifted in recent years. If you've got an older Intel-based Mac, the process looks close to identical to setting it up on a PC. If you're on one of the newer Apple Silicon Macs (the M1, M2, M3, or M4 chips), there are a couple of extra wrinkles worth knowing about before you start, since not every Android emulator plays nicely with Apple's newer processor architecture yet.
Either way, the core idea is the same as on Windows: DixMax APK is an Android file format, and macOS has no native way to run it. You'll need an emulator to create a virtual Android environment on your Mac, and DixMax installs into that environment the same way it would on a real Android phone or tablet. Below is the complete walkthrough, along with the Apple Silicon-specific notes and troubleshooting for when things don't go as planned. For the latest version and any Mac-specific updates, DixMax's official site is the best place to check before you start.
Intel Mac vs. Apple Silicon: Why It Matters Here
Before diving into the steps, it's worth taking a second to figure out which type of Mac you actually have, since this determines which emulator will work best for you.
To check: click the Apple menu in the top-left corner, select About This Mac, and look at the chip or processor listed. If it says Intel, you're on the older architecture. If it says Apple M1, M2, M3, or M4, you're on Apple Silicon.
This matters because some of the most popular Android emulators (BlueStacks, in particular) have historically had spottier support for Apple Silicon than for Intel Macs, since Apple's chips use a fundamentally different architecture than the Intel processors these emulators were originally built around. The good news is that emulator support for Apple Silicon has matured significantly, and most major options now run reasonably well, but performance can still vary more than it does on Windows PCs, so setting expectations here upfront will save you some frustration.
What You'll Need
A Mac running macOS 10.15 (Catalina) or later, whether Intel or Apple Silicon
At least 8GB of RAM (emulators tend to be more resource-hungry on Mac than on comparable Windows machines)
Roughly 5-8GB of free storage space
A stable internet connection
Administrator password for your Mac, since installing new software requires it
20-30 minutes of uninterrupted time
Step 1: Choose the Right Emulator for Your Mac
For Intel Macs, BlueStacks is generally the most reliable and beginner-friendly choice, with the smoothest setup process and widest community support.
For Apple Silicon Macs, you have a couple of solid options:
BlueStacks now offers a version built specifically for Apple Silicon, though it's worth confirming you're downloading the correct build for your chip rather than the Intel version, which will either fail to install or run poorly through emulation-within-emulation.
NoxPlayer also supports Apple Silicon and tends to be a lighter alternative if your Mac has less RAM to spare.
I'll walk through BlueStacks below since it applies to both chip types with only minor variation, and note where NoxPlayer differs if you'd rather use that instead.
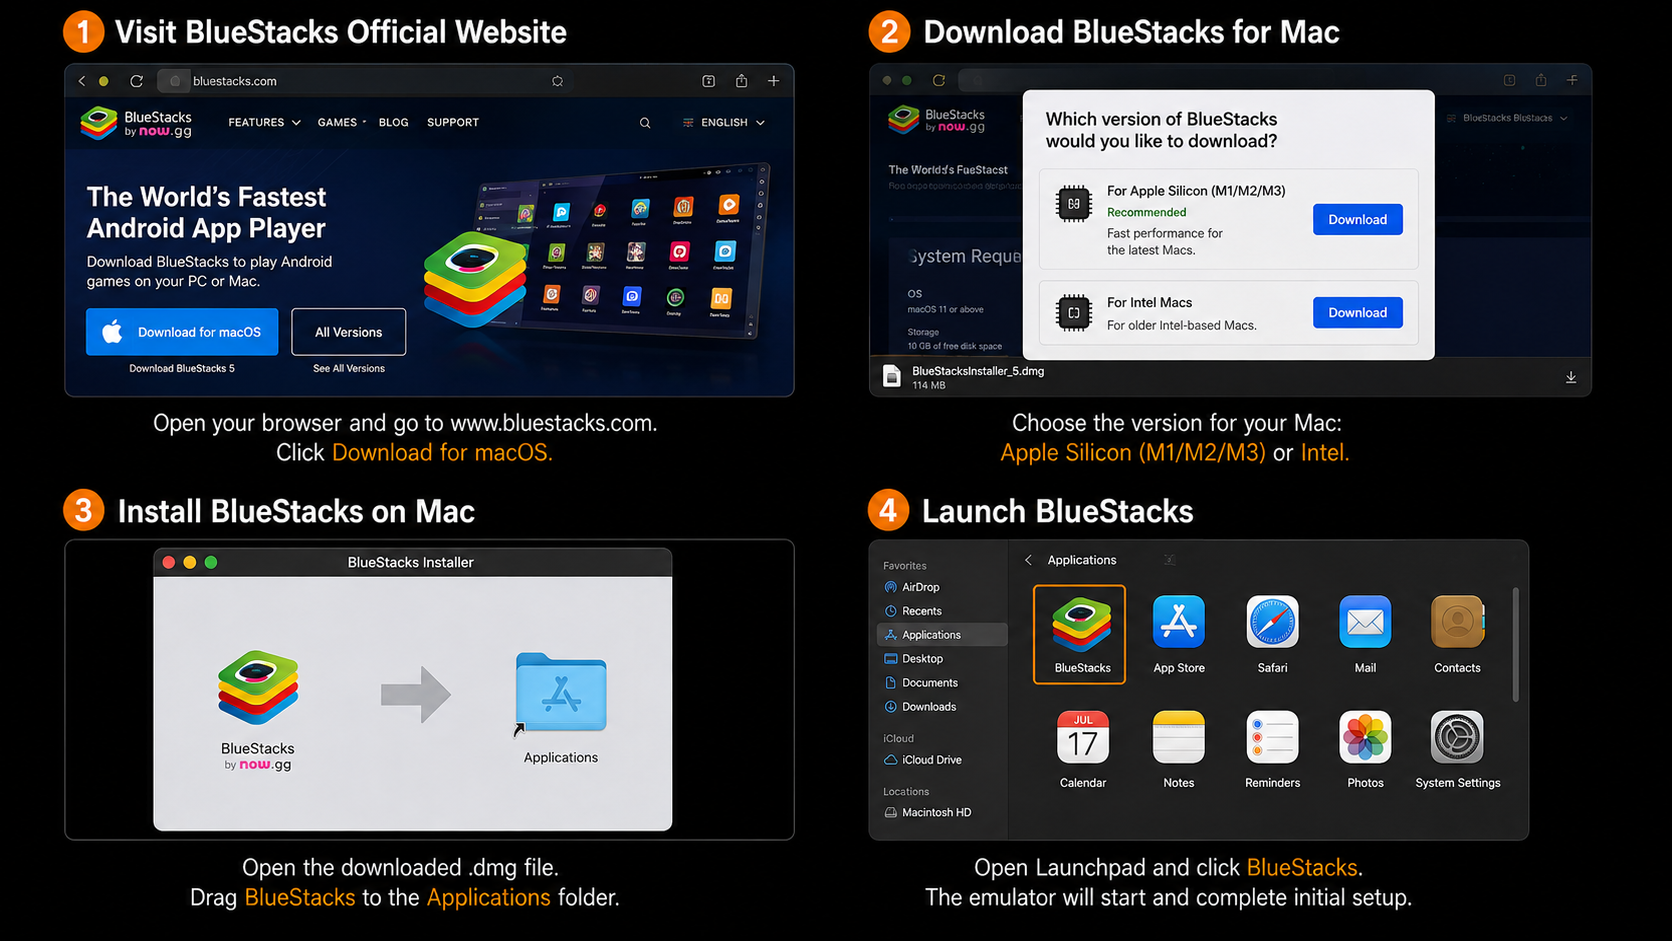
Step 2: Download and Install BlueStacks
Open Safari (or your preferred browser) and go to the official BlueStacks website.
The site should automatically detect whether you're on an Intel or Apple Silicon Mac and offer the correct download. If you're unsure it's detected correctly, look for an explicit Mac (Apple Silicon) or Mac (Intel) option and select the one matching what you found in Step 1 above.
Once the .dmg installer file finishes downloading, open your Downloads folder and double-click it.
A window will open showing the BlueStacks icon — drag it into your Applications folder as prompted.
Open your Applications folder and double-click BlueStacks to launch it for the first time.
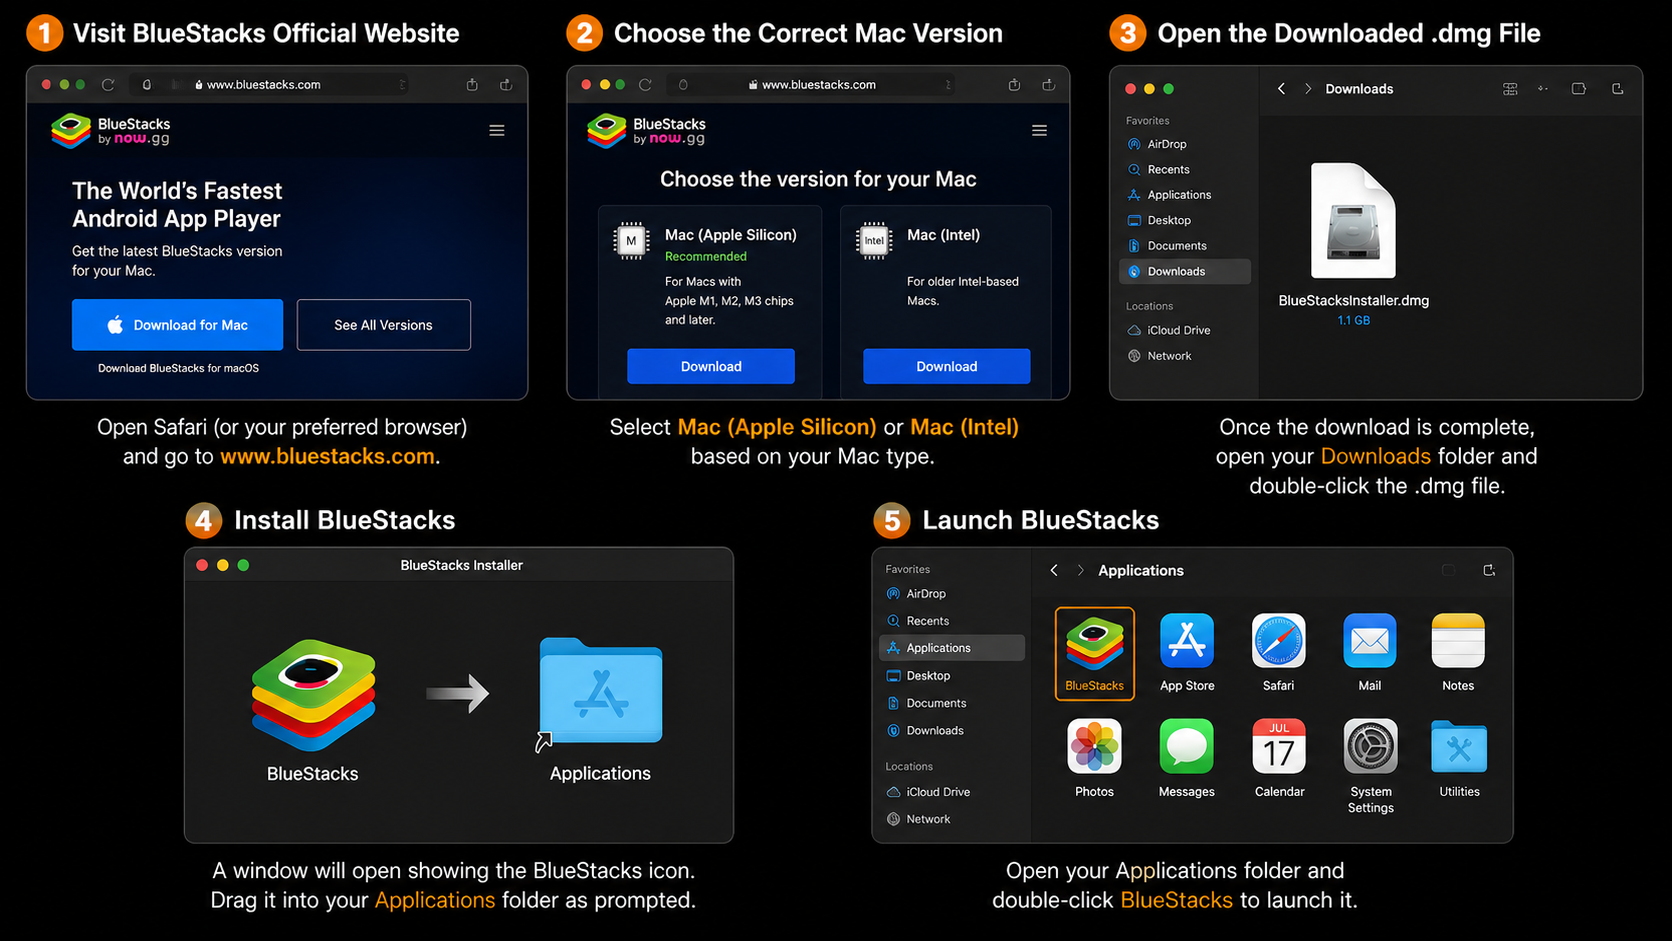
Step 3: Get Past macOS Security Prompts
Because BlueStacks isn't distributed through the Mac App Store, macOS's built-in security system (Gatekeeper) may initially block it from opening.
If you see a message saying the app "cannot be opened because it is from an unidentified developer" or similar, don't panic — this is standard macOS behavior for any app downloaded outside the App Store, not a sign of an actual problem.
Go to System Settings (or System Preferences on older macOS versions), then Privacy & Security.
Scroll down and you should see a message near the bottom mentioning BlueStacks was blocked, with an Open Anyway button next to it.
Click Open Anyway, then confirm again if prompted.
BlueStacks should now launch normally, and macOS will remember this permission going forward.
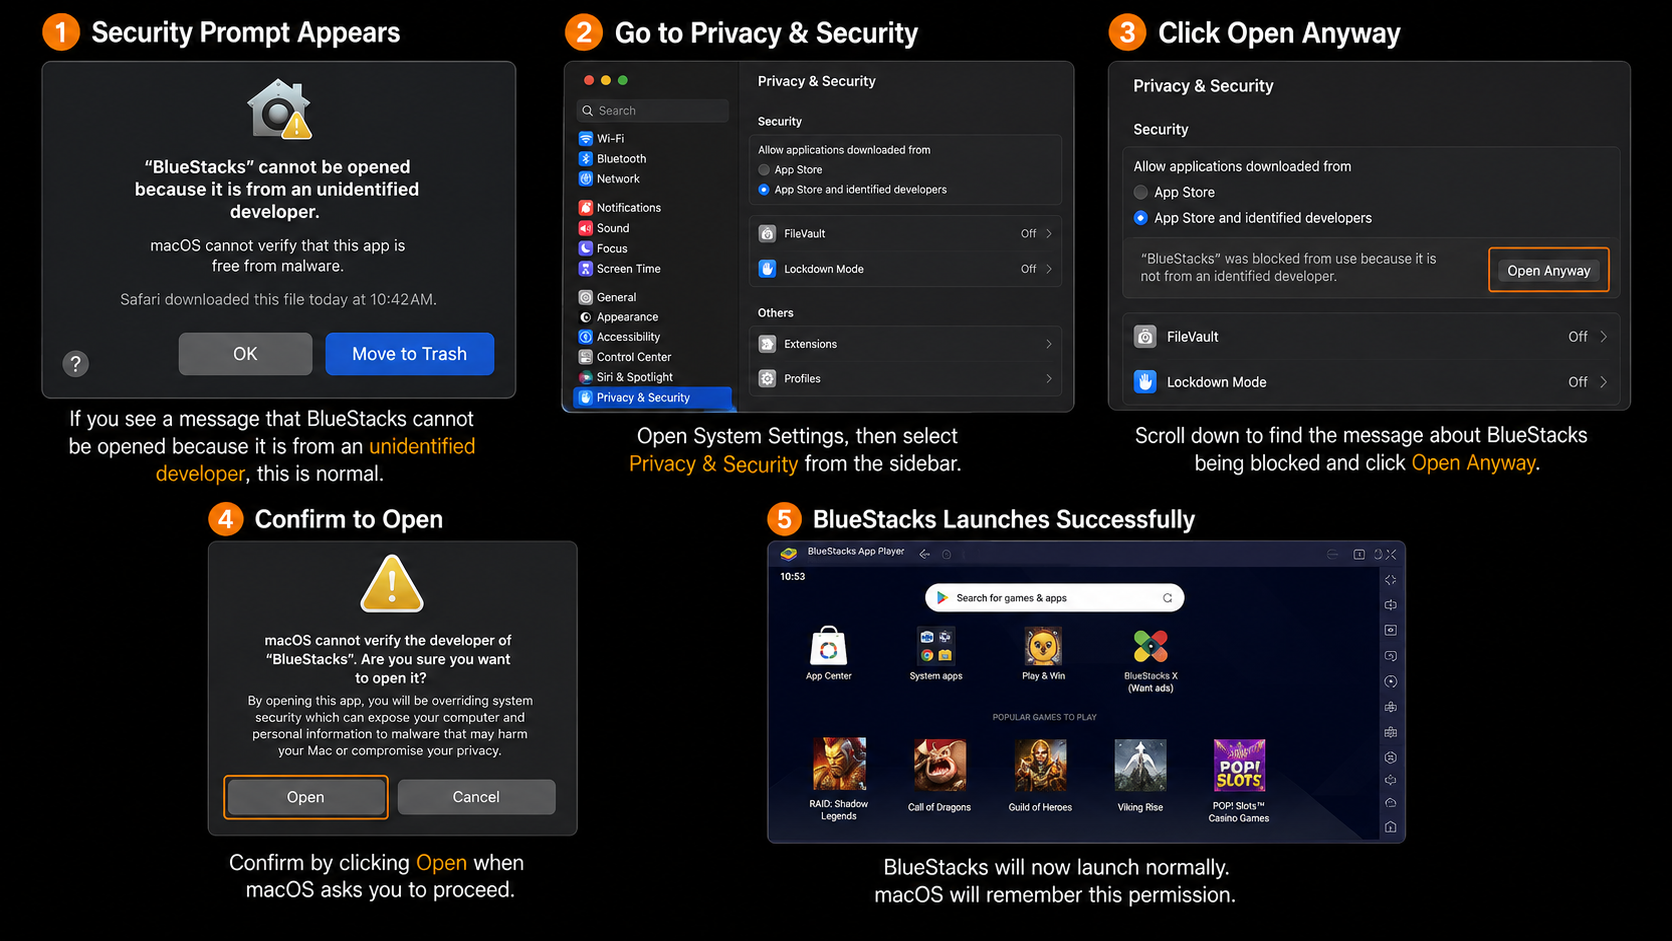
Step 4: Complete BlueStacks First-Time Setup
The first launch takes noticeably longer than a typical app, since BlueStacks is initializing an entire virtual Android system in the background. Give it a few minutes.
You'll be prompted to sign in with a Google account, which is needed for Play Store access within the emulator. Create one during this step if you don't already have one.
Once signed in, you'll land on the BlueStacks home screen, styled similarly to a standard Android tablet.
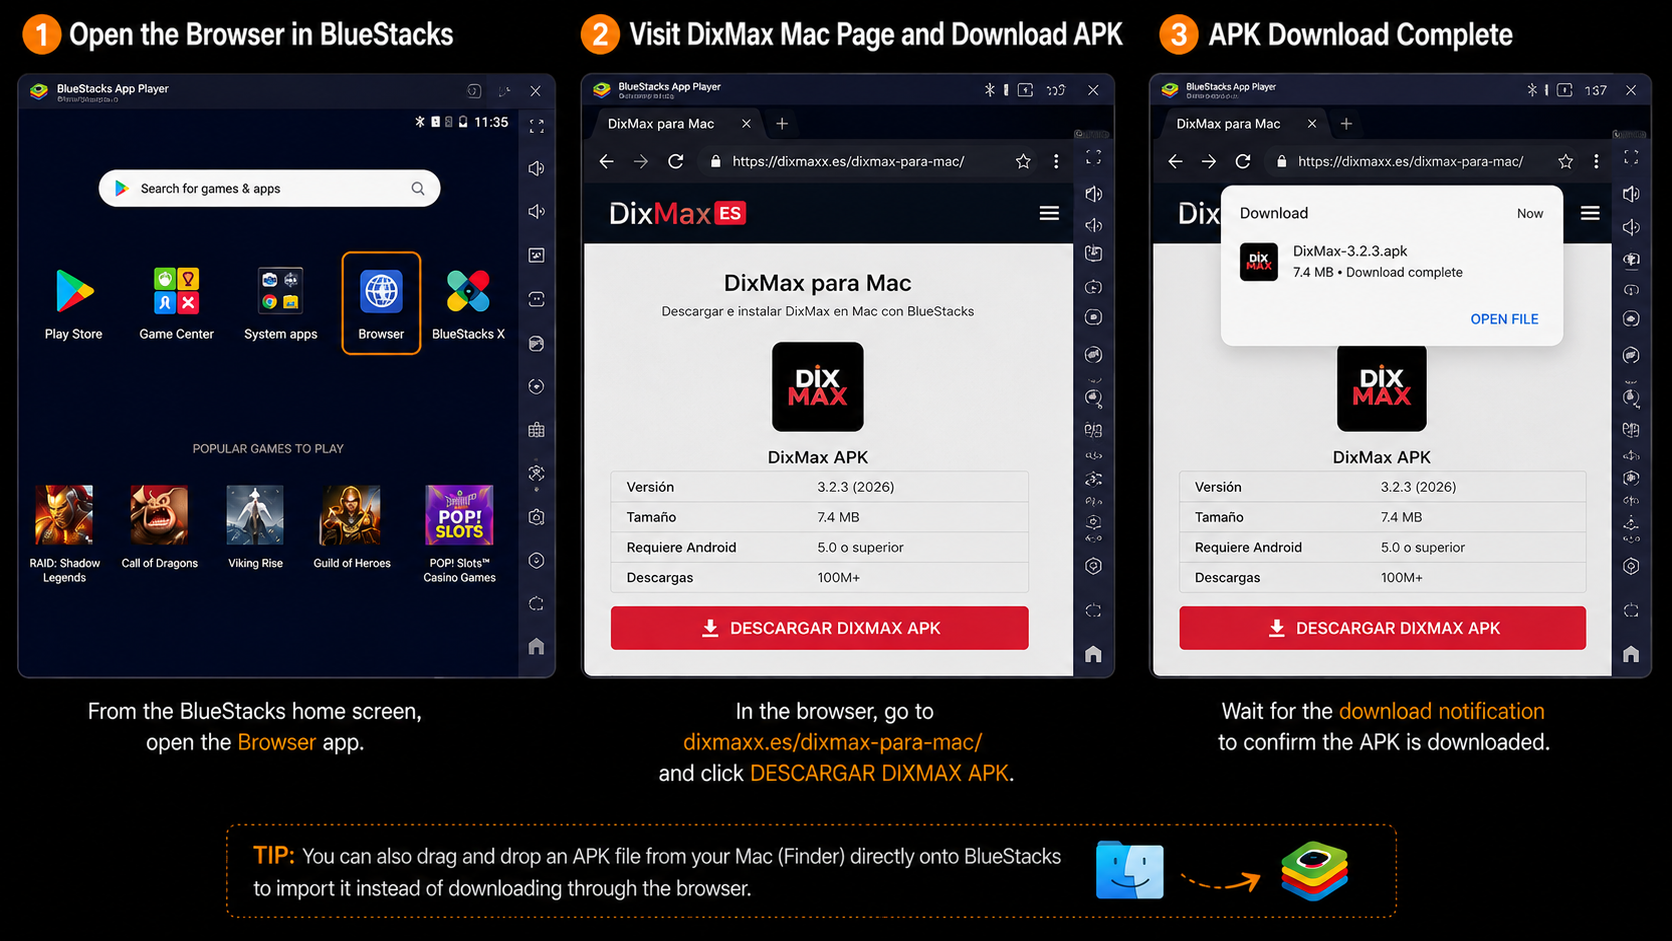
Step 5: Download the DixMax APK
Within BlueStacks, open the built-in browser app on the home screen.
Navigate to DixMax's Mac download page and download the APK from there.
Wait for the download notification to confirm it's finished.
Downloading directly through BlueStacks' internal browser keeps everything inside the virtual environment, which tends to be simpler than downloading through your Mac's regular browser and then transferring the file over — though if you'd rather do it that way, BlueStacks does support dragging a file from Finder directly onto the emulator window to import it.
Step 6: Install DixMax
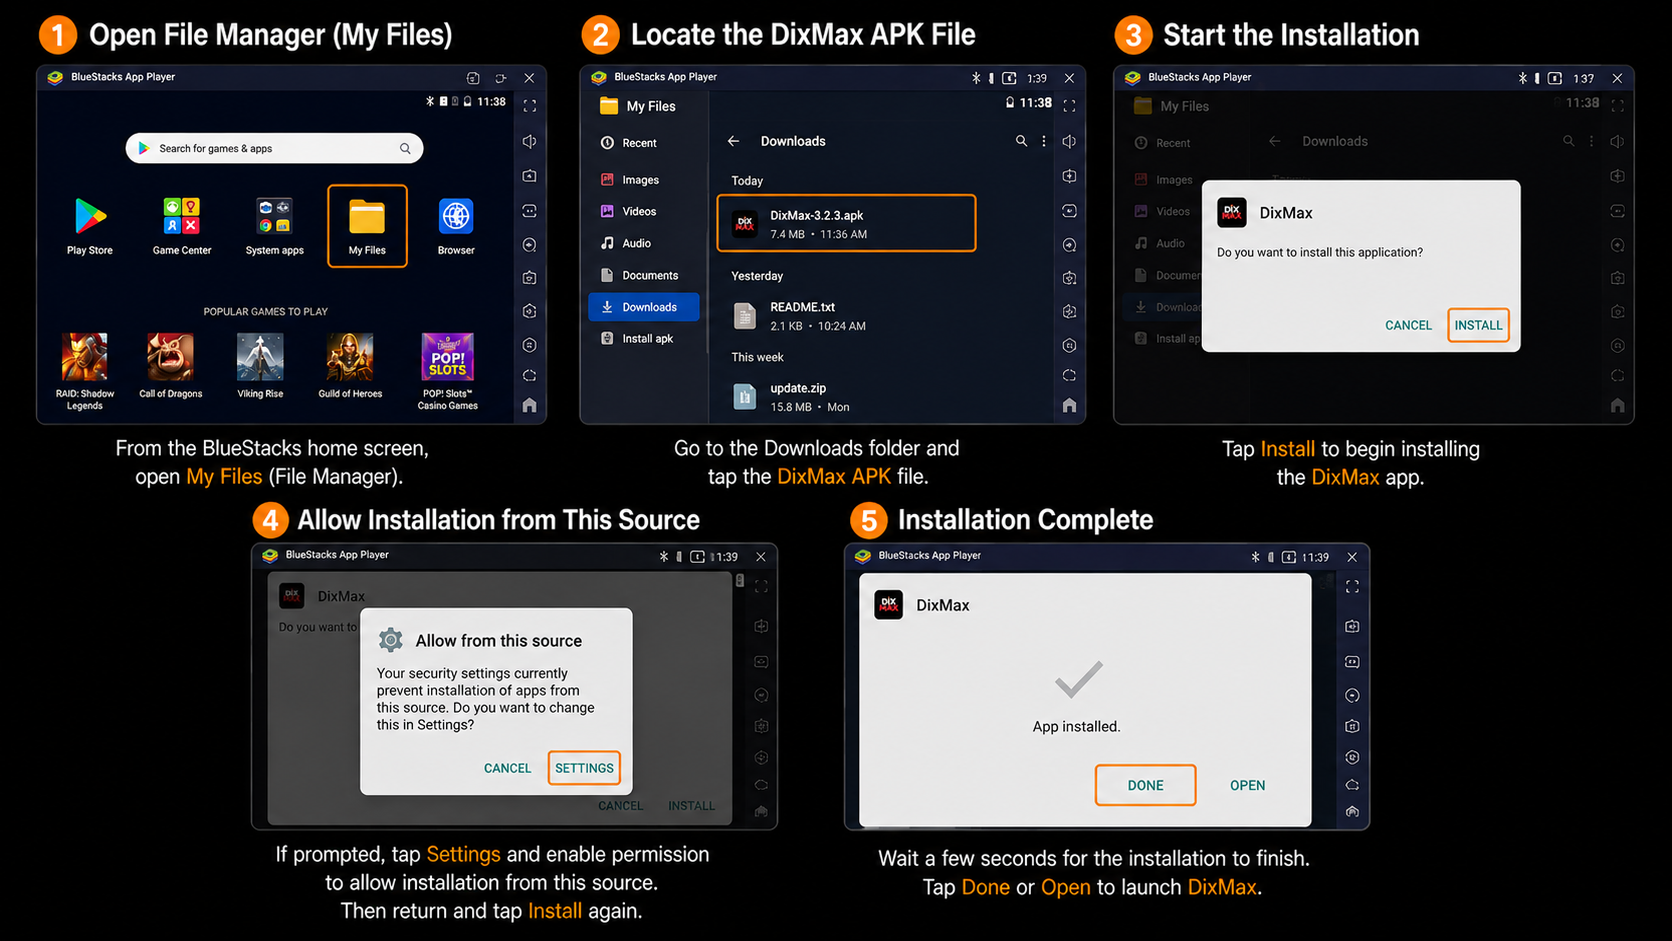
Open the file manager or My Apps section within BlueStacks.
Locate the DixMax APK file you just downloaded.
Click it to start the install process.
Confirm any prompt asking whether to allow installation from this source.
Wait for the installation confirmation to appear, which usually only takes a few seconds.
Step 7: Launch DixMax
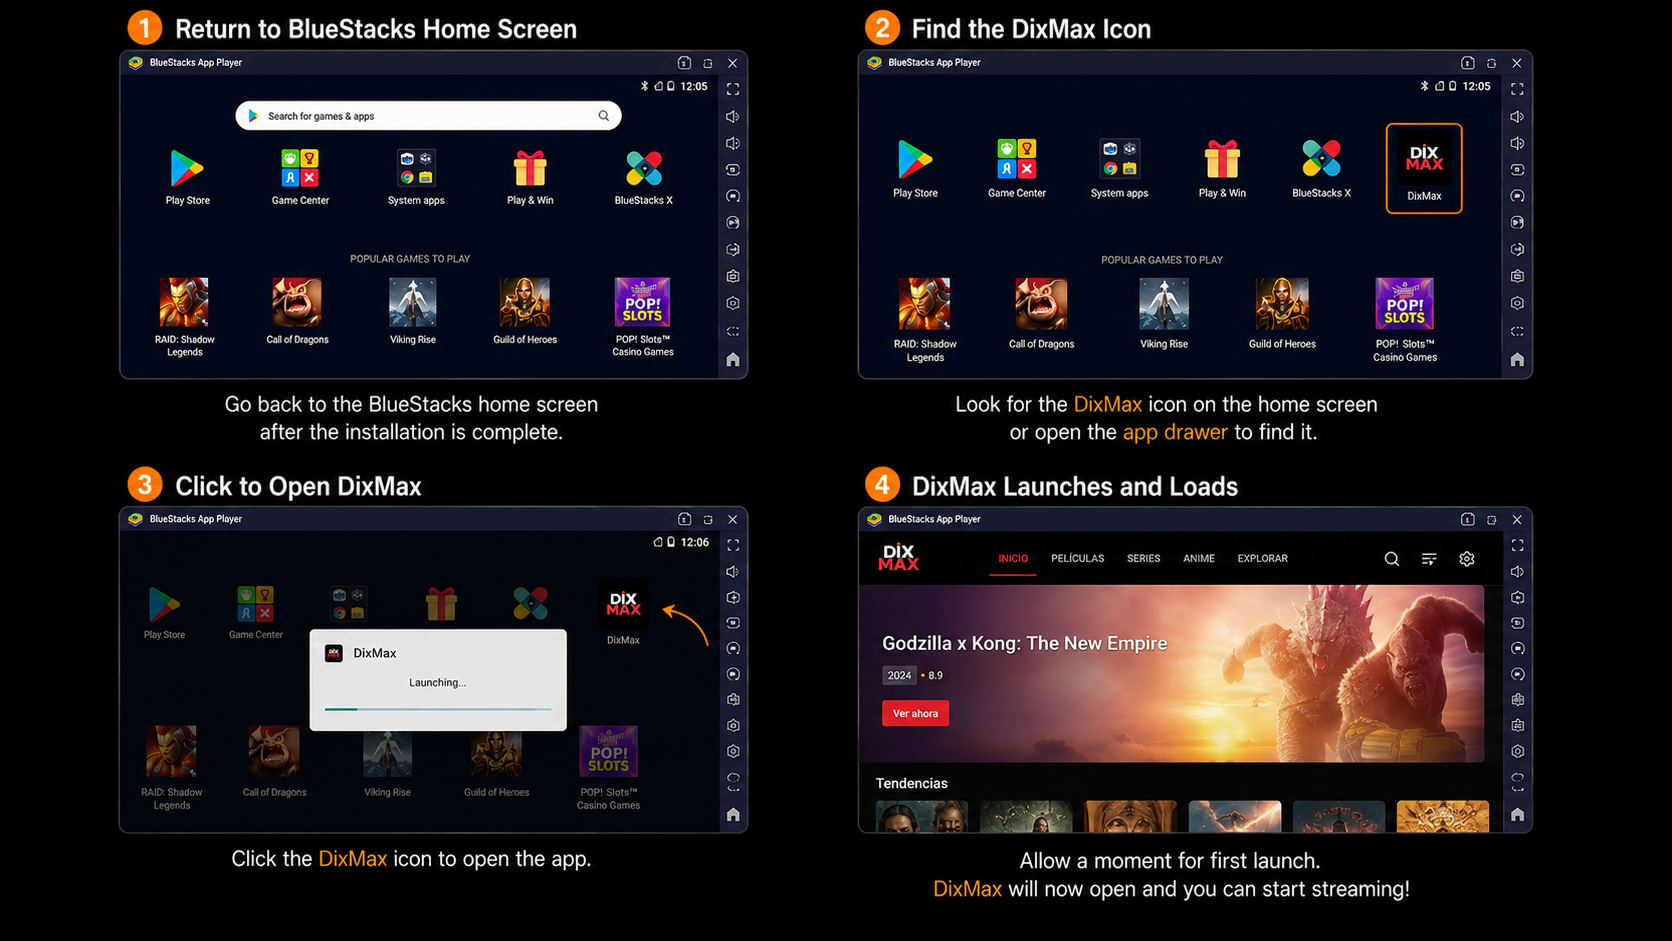
Return to the BlueStacks home screen.
Locate the DixMax icon, either on the main screen or inside the app drawer.
Click to open.
Allow a moment for first launch, since the app is setting itself up within the emulated environment for the first time.
From here, DixMax should function much like it does on a real Android device — you navigate with your Mac's trackpad or mouse instead of touch, which most people adjust to within a few minutes.
Using NoxPlayer on Mac Instead
If BlueStacks feels heavier than your Mac wants to handle, or you'd simply prefer an alternative:
Download NoxPlayer from its official site, making sure to select the Mac version compatible with your chip.
Open the downloaded installer and drag NoxPlayer into your Applications folder, same as with BlueStacks.
You may need to grant it permission through Privacy & Security the same way described above for BlueStacks.
Launch NoxPlayer, complete the initial Google sign-in, then use its built-in browser to download the DixMax APK.
Install and open DixMax the same way as outlined above.
NoxPlayer tends to run a bit lighter on system resources, which some users on older or lower-RAM Macs find noticeably smoother than BlueStacks.
Adjusting Performance for Smoother Playback
If DixMax feels sluggish or video stutters once you're up and running:
Open BlueStacks' settings (usually accessible via a gear or menu icon within the app).
Look for a Performance or Engine section.
Increase allocated RAM and CPU cores if your Mac has resources available to spare — emulators are typically configured conservatively out of the box to avoid overwhelming lower-spec machines.
If available, check for a graphics rendering mode setting; switching between compatibility and performance modes sometimes resolves stuttering that persists even after adjusting RAM and CPU allocation.
Troubleshooting Common Issues
BlueStacks won't open at all, even after allowing it in Privacy & Security. Restart your Mac fully and try again — occasionally the permission doesn't take effect until after a restart.
Installed the wrong version for my chip. If you downloaded the Intel version on an Apple Silicon Mac (or vice versa), performance will be noticeably poor or the app may not launch correctly. Uninstall it completely, confirm your chip type again through About This Mac, and reinstall the matching version.
DixMax APK download fails inside the emulator's browser. Double-check the link for typos, and if the page seems unreachable altogether, the hosting location may have changed — search for a current link rather than repeatedly trying a broken one.
App installs but won't launch. Fully quit BlueStacks (not just close the window — quit it from the menu bar or Activity Monitor) and relaunch. This clears out background processes that occasionally interfere with a freshly installed app's first launch.
Video playback stutters despite good internet. This usually points to insufficient resources allocated to the emulator. Revisit the performance settings above, and close other resource-heavy apps running on your Mac at the same time, since emulators compete for the same RAM and CPU as everything else open.
Google sign-in gets stuck in a loop. Quit and reopen BlueStacks, then try signing in again — this resolves it in most cases. If the loop persists, uninstalling and reinstalling BlueStacks typically clears whatever cached data is causing it.
Keeping DixMax Updated
Since you're sideloading rather than installing through an official store, DixMax won't update automatically. Check back periodically at your trusted download source for a newer APK version, and repeat the install steps above — the new version generally installs over the old one without requiring a full uninstall first.
Final Thoughts
Setting up Dixmax mac-side through an emulator involves a few more steps than a typical Mac App Store install, but none of them are particularly difficult once you know what to expect — the main things to get right are matching the emulator build to your specific chip and getting past macOS's initial security prompt, both of which are one-time hurdles rather than ongoing hassles. After that first setup, opening DixMax on your Mac becomes just as routine as opening any other app in your Applications folder.
If you run into an error not covered here, searching the exact wording of the message usually turns up a fix quickly, since running Android apps on Mac through emulation is common enough that most issues have already been documented by others who've hit the same wall. For updated download links and any Mac-specific notes as DixMax evolves, DixMax's dedicated Mac guide is worth bookmarking.